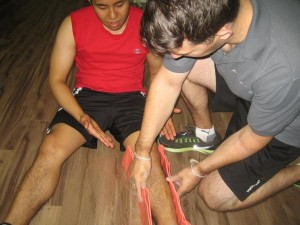
A splint is used to hold an injured part of the body, often a broken bone or severe sprain/ strain, from moving and to protect it from any further damage.
A splint is used to immobilise or hold an injured part of the body from moving and to protect it from any further damage. It aims to alleviate pain symptoms. A splint is a type of medical equipment used until medical help arrives. It is necessary to check for good circulation after the injured part has been immobilised. Splints can be utilized for many different injuries, but they are commonly used for broken bones or severe sprains or strains in the limbs.
How to Make a Splint: Basic Materials
A splint can be made using many materials found at home and in the office.
- Support: heavy sticks, boards, planks, rolled up newspapers, towels, rolled blanket or clothing
- Pads or cloth to wrap the injured area
- To tie: belts, shoe laces, cloth strips, neckties, ropes
- Tape, preferably not commercial tape
How to Make a Splint: Improvised Materials
It is possible that injuries occur in the wilderness where the basic materials are not possible. Thus, in cases where injuries requiring a splint occur in the wilderness, the following improvised materials may be used:
- Trekking poles, tent poles, inner portion of the backpack, sections of camping chair
- Tree limbs or branches
- Clothing or bundles of grasses or leaves for padding
- Bandanas
- Elastic bandages
How to Make a Splint: Procedure
Before creating a splint for any type of injury, ensure that care is given for all wound before applying a splint. If there is bleeding, treat this first appropriately. To make a splint, it is recommended to follow the steps in order.
- Apply a splint to the injured part by way the position in which it was found. Do not attempt to move the injured part of the body to avoid further damage.
- After finding rigid material to use as support, fasten the splint in place. Ensure that the splint is extended beyond the injured area to completely immobilise the affected area. Generally it is recommended to include the joint above and below the injury in the splint.
- In cases wherein no material can be found, tape the injured body part to an uninjured body to avoid movement. Avoid using commercial tape against a person’s skin
- To secure the splint in place, tie using any of the materials mentioned above or tape above and below the injury. Avoid placing ties directly over the injured area. Ensure that the knots do not press on the injury.
- Do not over-tighten to avoid circulation.
- Check the part for swelling, paleness, or numbness frequently. If there are signs of cyanosis (bluish skin), loosen the splint.
- Always seek professional medical attention.

How to Make a Splint
Disclaimer: This article does not provide medical advice and should not be substituted for formal training. Seek medical attention when necessary. To learn how to properly make a splint in different situations, enrol in First Aid Courses and CPR Courses with St Mark James Training.
Online Sources:
http://www.healthline.com/health/how-to-make-a-splint?toptoctest=expand
http://www.nlm.nih.gov/medlineplus/ency/article/000040.htm
http://survival.about.com/od/4/a/How-To-Make-An-Improvised-Splint.htm
